
Five minutes together
Look. Wonder. Talk.
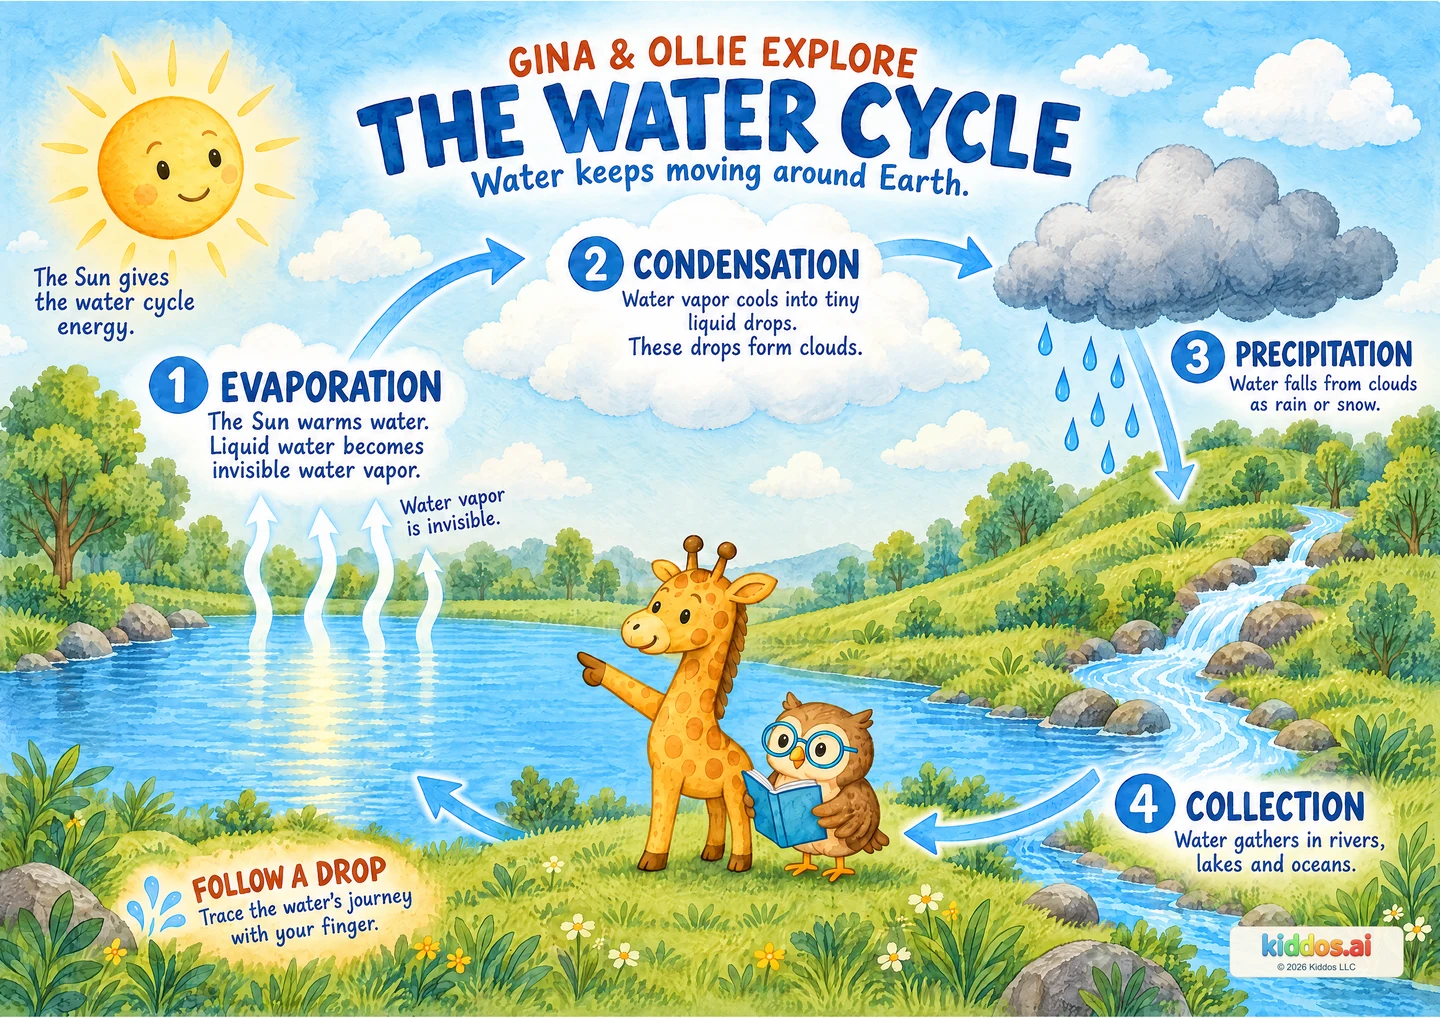
Our discovery: Describe a pictured water journey while distinguishing diagram symbols from visible water.
Remember: We compared ice, liquid water and invisible water vapor. How might water move between places as it changes form?
Revisit that discoveryBegin at the lake and trace the water’s journey together. Read the four labels slowly, connecting each word to the picture. Explain that the rising marks help us imagine evaporation: water vapor itself is invisible. Let your child choose a starting point and tell a short water-journey story using the scene.
Imagine following a drop of water. Where would you begin in this picture?
Start here
Trace from the lake to the cloud and back toward the ground.
Explore further
Explain what is invisible during evaporation and what a cloud is made of.
Three questions to share
1What gives this cycle energy?
Answer cue: The Sun warms water.
2What happens when water vapor cools and condenses?
Answer cue: It becomes tiny liquid drops that can make clouds.
3Where can water gather after it falls?
Answer cue: In rivers, lakes and oceans.
If your child is unsure: Let’s use one clue together. Trace from the lake to the cloud and back toward the ground.
Something to try together
A little water, observed over time
You’ll need: An adult, shallow unbreakable dish, a little water and paper or dictation.
- An adult places a little water in a shallow unbreakable dish on a stable surface away from electronics and children’s unsupervised access.
- Record the water level with a drawing and the date; predict whether it will look the same later.
- An adult helps revisit it on another day. Record what you actually see, then discuss evaporation as a possible explanation for a lower level. Empty the dish afterward.
What this can show
The level may change slowly and a dish can also lose water through spills. A falling level alone does not show visible vapor or prove every step of the whole cycle.
Return to it: On a later safe window look, notice clouds or rain. Which part of the diagram helps you talk about that observation?
Get the guide and discovery recordFor teachers · About 20 minutes
A small lesson with room to explore.
Learning aim: Describe a pictured water journey while distinguishing diagram symbols from visible water.
Prepare: Read the poster, answer cues and misconception note. Prepare only the materials named in the activity; keep a picture-only or described option available.
- 3 min
Reconnect and wonder
Where can water go after a puddle gets smaller? Invite an initial idea; record it without marking it right or wrong.
- 4 min
Look together
Trace from the lake to the cloud and back toward the ground. Introduce evaporation using the poster.
- 8 min
Investigate or represent
Use “A little water, observed over time.” Let pairs take turns noticing and recording, with adult help and the activity’s stated boundaries.
- 5 min
Explain and return
Ask the core check: Where can water go after a puddle gets smaller? Accept pointing, words, signing or a drawing. If the learner is ready, offer this optional extension: Explain what is invisible during evaporation and what a cloud is made of.
Check the idea together
Where can water go after a puddle gets smaller?
What to listen for
Some liquid water can change into invisible water vapor in the air through evaporation. In the wider cycle, vapor can condense into drops, and water can fall and collect again. The level may change slowly and a dish can also lose water through spills. A falling level alone does not show visible vapor or prove every step of the whole cycle.
Accept pointing, speech, signing, a drawing or adult dictation. Describe the illustration and use labels/position as well as color. Offer one contrast first, and use the extension when the learner is ready.